---
title: iOS Setup
description: Setup home_widget on iOS for your Flutter App
nextTitle: Android Setup
next: /setup/android
---
> ## Documentation Index
> Fetch the complete documentation index at: https://docs.page/abausg/home_widget/llms.txt
> Use this file to discover all available pages before exploring further.
# iOS Setup
On iOS Widgets are an App Extension.
The following steps explain how to add the correct App Extension, how to do the basic configuration to read/display data you send from your App in the Widget and how to setup GroupIds to ensure the correct communication between your App and the Widget.
## Add a Widget to your App in Xcode
Add a widget extension by going File > New > Target > Widget Extension
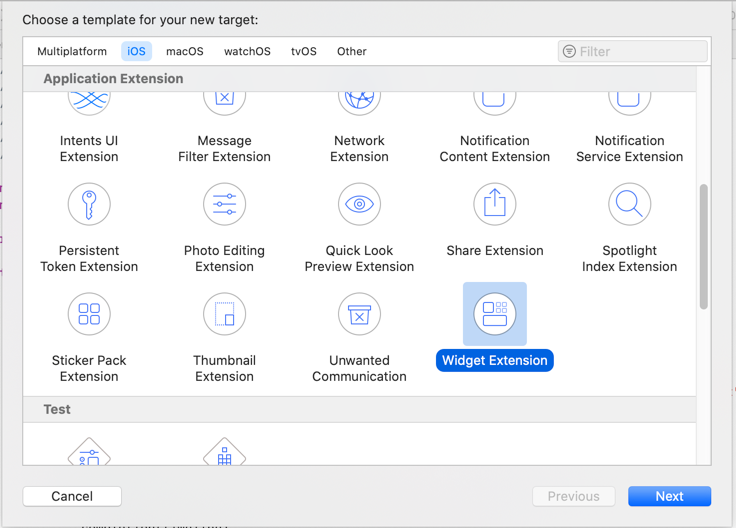
Fill in your desired name for the Widget

This documentation is based on a non-configurable Widget. Leave the Include Configuration App Intent option unchecked to follow this example.
If you want build configurable widgets with home_widget follow the [documentation for configurable widgets](/features/configurable-widgets).
However it is advised to read through this page as well, as there are concepts that will be referenced in the other documentation.
The generated Widget code includes the following classes:
- `TimelineProvider` - Provides a Timeline of entries at which the System will update the Widget automatically
- `TimelineEntry` - Represents the Data Object used to build the Widget. The `date` field is necessary and defines the point in time at which the Timeline would update
- `View` - The Widget itself, which is built with SwiftUI
- `Widget` - Configuration: Make note of the `kind` you set in the Configuration as this is what's needed to update the Widget from Flutter
## Configure Widget
### Widget
In the Widget Configuration it is important to set the `kind` to the same value as the `name`/`iOSName` in the `updateWidget` function in Flutter
### TimelineEntry / TimelineProvider
Adjust the `TimelineEntry` to match your desired Data Structure you need to build your Widget. This entry is what is passed to the actual `View` to build the Widget.TimelineEntry
```swift
struct CounterEntry: TimelineEntry {
let date: Date
let counter: Int
}
```
Adjust the `TimelineProvider` to build a timeline (can be single entry if all updating is always handled from Flutter) where you create a `TimelineEntry` based on the Data stored with `HomeWidget.saveWidgetData`
```swift
struct Provider: TimelineProvider {
func placeholder(in context: Context) -> CounterEntry {
CounterEntry(date: Date(), counter: 0)
}
func getSnapshot(in context: Context, completion: @escaping (SimpleEntry) -> ()) {
let prefs = UserDefaults(suiteName: "group.YOUR_GROUP_ID")
let counter = prefs?.integer(forKey: "counter")
let entry = CounterEntry(date: Date(), counter: counter ?? 0)
completion(entry)
}
func getTimeline(in context: Context, completion: @escaping (Timeline) -> ()) {
getSnapshot(in: context) { (entry) in
let timeline = Timeline(entries: [entry], policy: .atEnd)
completion(timeline)
}
}
}
```
### View
In the View you build your Layout of the Widget. Using the `TimelineEntry` you can access the Data you stored in `UserDefaults` and build your Widget accordingly
```swift
struct WidgetEntryView : View {
var entry: Provider.Entry
var body: some View {
VStack {
Text(entry.counter.description)
}
}
}
```
For more Information on how to build Widgets in iOS, check out the [Apple Documentation](https://developer.apple.com/documentation/swiftui/widget)
## GroupId
home_widget syncs data between your App and the Widget using App Groups.
**Note: in order to add groupIds you need a paid Apple Developer Account**
Go to your [Apple Developer Account](https://developer.apple.com/account/resources/identifiers/list/applicationGroup) and add a new group.
Add this group to your Runner and the Widget Extension inside XCode: Signing & Capabilities > App Groups > +.
To swap between your App, and the Extension change the Target)

### Setup in Flutter
For iOS, you need to call `HomeWidget.setAppGroupId('YOUR_GROUP_ID');`
Without this you won't be able to share data between your App and the Widget and calls to `saveWidgetData` and `getWidgetData` will return an error
## Troubleshooting
If you encounter a build cycle error related to the "Thin Binary" script phase when building your app with a widget extension, you need to reorder the build phases in Xcode.
The error typically looks like:
```
Cycle details:
→ Target 'Runner' has copy command from '.../WidgetExtension.appex' to '.../Runner.app/PlugIns/WidgetExtension.appex'
○ That command depends on command in Target 'Runner': script phase "Thin Binary"
```
To fix this:
1. In Xcode, select your **Runner** target
2. Go to Build Phases
3. Find the **"Thin Binary"** script phase
4. Drag it to the **bottom** of the build phases list (it should be the last phase)
The "Thin Binary" script phase should run after all other build phases, including the copy phase that embeds the widget extension into your app bundle.
## Bonus
This step is optional, this will sync the widget extension build version with your app version, so you don't get warnings of mismatch version from App Store Connect when uploading your app.
The app target gets its version from the `FLUTTER_BUILD_NAME` and `FLUTTER_BUILD_NUMBER` variables, which Flutter writes to `ios/Flutter/Generated.xcconfig`. The widget extension has no `.xcconfig` file, so it does not see them. Give it one:
1. In Xcode, right-click the Flutter group and choose New File from Template > Configuration Settings File. Save it as `ios/Flutter/HomeWidget.xcconfig`, without adding it to a target, with this content:
```text
FLUTTER_BUILD_NAME = 1.0
FLUTTER_BUILD_NUMBER = 1
#include? "Generated.xcconfig"
```
The first two lines are defaults for a project that was never built; the include overrides them.
2. In Xcode, select the project in the navigator and open Info > Configurations. Expand every configuration (Debug, Release, Profile, and the ones of your flavors) and set `HomeWidget` as the configuration of your widget extension target.
3. Select the widget extension target, open Build Settings and set Current Project Version to `$(FLUTTER_BUILD_NUMBER)` and Marketing Version to `$(FLUTTER_BUILD_NAME)`.
Now `flutter build ios --build-name=1.2.3 --build-number=45` gives the widget extension the same `CFBundleShortVersionString` and `CFBundleVersion` as the app.
If you use the [CLI](/cli/generate), it sets this up for you and keeps it up to date.