Nested Navigation
Sometimes you want to choose a page based on a route as well as the state of
that screen, e.g. the currently selected tab. In that case, you want to choose
not just the screen from a route but also the widgets nested inside the screen.
That's called "nested navigation". The key differentiator for "nested"
navigation is that there's no transition on the part of the page that stays the
same, e.g. the app bar stays the same as you navigate to different tabs on this
TabBarView:
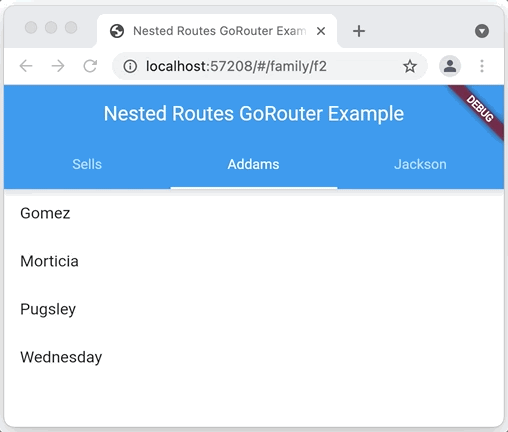
Of course, you can easily do this using the TabBarView widget, but what makes
this nested "navigation" is that the location changes, i.e. notice the address
bar as the user transitions from tab to tab. This makes it easy for the user to
capture a dynamic link for any object in the
app, enabling deep linking.
To use nested navigation using go_router, you can simply navigate to the same
page via different paths or to the same path with different parameters, with the
differences dictating the different state of the page. For example, to implement
that screen with the TabBarView above, you need a widget that changes the
selected tab via a parameter:
class FamilyTabsScreen extends StatefulWidget {
  final int index;
  FamilyTabsScreen({required Family currentFamily, Key? key})
      : index = Families.data.indexWhere((f) => f.id == currentFamily.id),
        super(key: key) {
    assert(index != -1);
  }

  @override
  _FamilyTabsScreenState createState() => _FamilyTabsScreenState();
}

class _FamilyTabsScreenState extends State<FamilyTabsScreen>
    with TickerProviderStateMixin {
  late final TabController _controller;

  @override
  void initState() {
    super.initState();
    _controller = TabController(
      length: Families.data.length,
      vsync: this,
      initialIndex: widget.index,
    );
  }

  @override
  void dispose() {
    _controller.dispose();
    super.dispose();
  }

  @override
  void didUpdateWidget(FamilyTabsScreen oldWidget) {
    super.didUpdateWidget(oldWidget);
    _controller.index = widget.index;
  }

  @override
  Widget build(BuildContext context) => Scaffold(
        appBar: AppBar(
          title: Text(_title(context)),
          bottom: TabBar(
            controller: _controller,
            tabs: [for (final f in Families.data) Tab(text: f.name)],
            onTap: (index) => _tap(context, index),
          ),
        ),
        body: TabBarView(
          controller: _controller,
          children: [for (final f in Families.data) FamilyView(family: f)],
        ),
      );

  void _tap(BuildContext context, int index) =>
      context.go('/family/${Families.data[index].id}');

  String _title(BuildContext context) =>
      (context as Element).findAncestorWidgetOfExactType<MaterialApp>()!.title;
}
The FamilyTabsScreen is a stateful widget that takes the currently selected
family as a parameter. It uses the index of that family in the list of families
to set the currently selected tab. However, instead of switching the currently
selected tab to whatever the user clicks on, it uses navigation to get to that
index instead. It's the use of navigation that changes the address in the
address bar. And, the way that the tab index is switched is via the call to
didUpdateWidget. Because the FamilyTabsScreen is a stateful widget, the
widget itself can be changed but the state is kept. When that happens, the call
to didUpdateWidget will change the index of the TabController to match the
new navigation location.
To implement the navigation part of this example, we need a route that
translates the location into an instance of FamilyTabsScreen parameterized
with the currently selected family:
final _router = GoRouter(
  routes: [
    GoRoute(
      path: '/',
      redirect: (_) => '/family/${Families.data[0].id}',
    ),
    GoRoute(
      path: '/family/:fid',
      builder: (context, state) {
        final fid = state.params['fid']!;
        final family = Families.data.firstWhere((f) => f.id == fid,
            orElse: () => throw Exception('family not found: $fid'));

        return FamilyTabsScreen(key: state.pageKey, currentFamily: family);
      },
    ),
  ],
);
The / route is a redirect to the first family. The /family/:fid route is the
one that sets up nested navigation. It does this by first creating an
instance of FamilyTabsScreen with the family that matches the fid parameter.
And second, it uses state.pageKey to signal to Flutter that this is the same
page as before. This combination is what causes the router to leave the page
alone, to update the browser's address bar and to let the TabBarView navigate to
the new selection.
This may seem like a lot, but in summary, you need to do two things with the page you create in your page builder to support nested navigation:
-
Use a
StatefulWidgetas the base class of your screen widget. -
As the user navigates, you'll create the same
StatefulWidget-derived type, passing in new data, e.g. which tab is currently selected. Because you're using a widget with the same key, Flutter will keep the state but swap out the widget wrapping w/ the new data as constructor args. When that new widget wrapper is in place, Flutter will calldidUpdateWidgetso that you can use the new data to update the existing widgets, e.g. the selected tab.
This example shows off the selected tab on a TabBarView but you can use it for
any nested content of a page your app navigates to.
Keeping State
When doing nested navigation, the user expects that widgets will be in the same
state that they left them in when they navigated to a new page and return, e.g.
scroll position, text input values, etc. You can enable support for this by
using AutomaticKeepAliveClientMixin on a stateful widget. You can see this in
action in the FamilyView of the
nested_nav.dart
example:
class FamilyView extends StatefulWidget {
  const FamilyView({required this.family, Key? key}) : super(key: key);
  final Family family;

  @override
  State<FamilyView> createState() => _FamilyViewState();
}

/// Use the [AutomaticKeepAliveClientMixin] to keep the state.
class _FamilyViewState extends State<FamilyView>
    with AutomaticKeepAliveClientMixin {

  // Override `wantKeepAlive` when using `AutomaticKeepAliveClientMixin`.
  @override
  bool get wantKeepAlive => true;

  @override
  Widget build(BuildContext context) {
    // Call `super.build` when using `AutomaticKeepAliveClientMixin`.
    super.build(context);
    return ListView(
      children: [
        for (final p in widget.family.people)
          ListTile(
            title: Text(p.name),
            onTap: () =>
                context.go('/family/${widget.family.id}/person/${p.id}'),
          ),
      ],
    );
  }
}
To instruct the AutomaticKeepAliveClientMixin to keep the state, you need to
override wantKeepAlive to return true and call super.build in the State
class's build method, as show above.
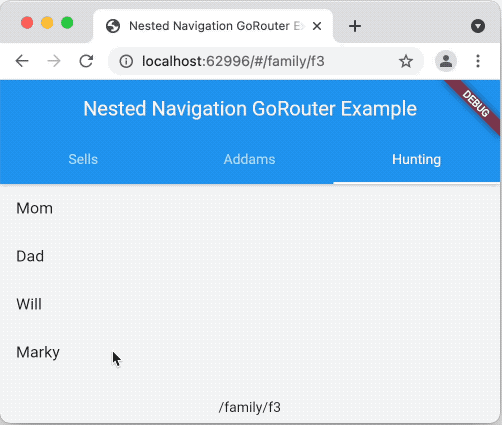
Notice that after scrolling to the bottom of the long list of children in the Hunting family, then going to another tab and then going to another page, when you return to the list of Huntings that the scroll position is maintained.