---
title: Payment Sheet
description: Accept a payment with Payment Sheet.
---
# Accept a payment - Payment Sheet
### Securely accept payments online.
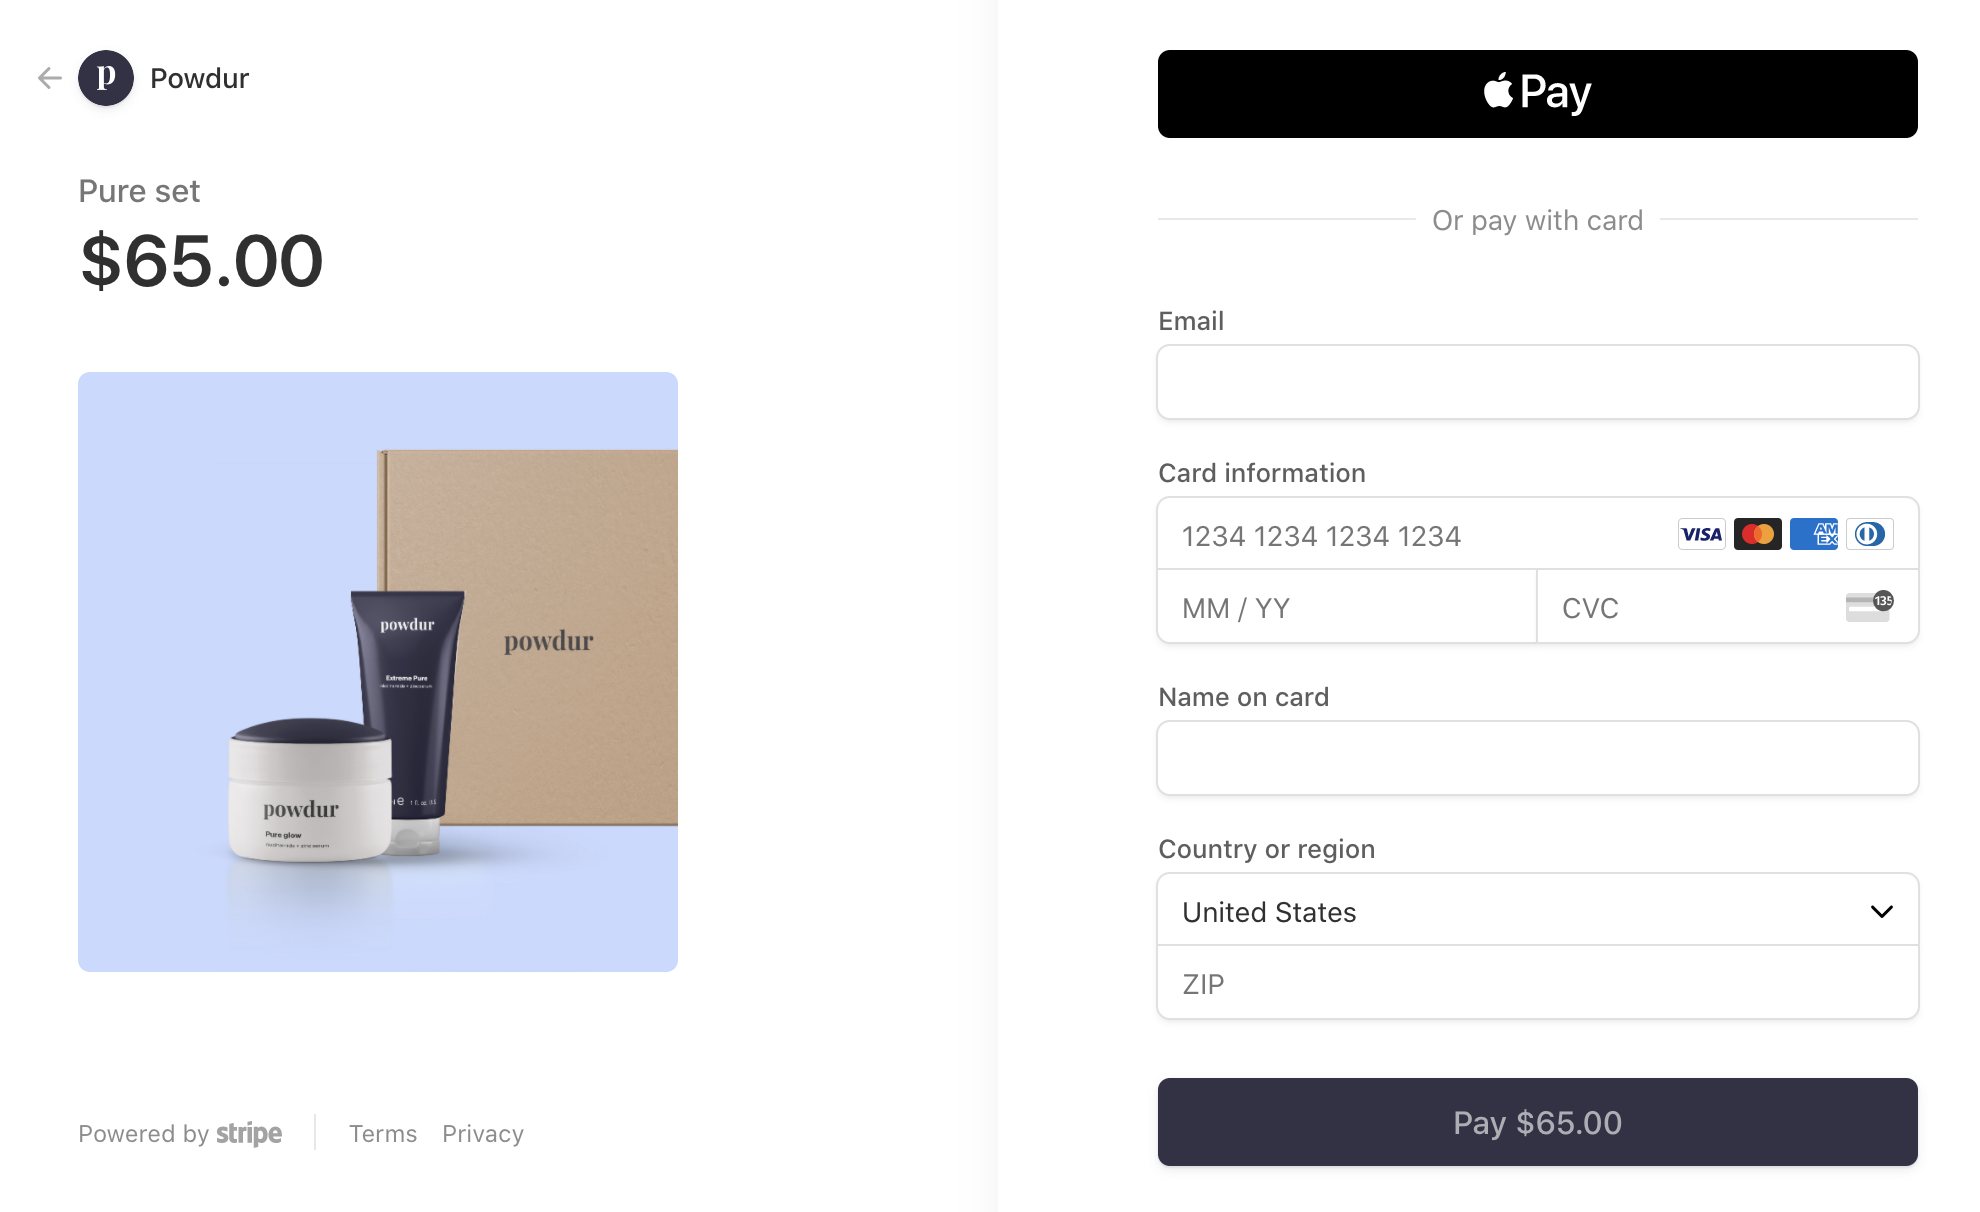 Integrate Stripe’s prebuilt payment UI into the checkout of your app with the PaymentSheet class.
This integration combines all of the steps required to pay—collecting payment details and confirming the payment—into a single sheet that displays on top of your app.
## 1. Set up Stripe [Server Side] [Client Side]
First, you need a Stripe account. [Register now](https://dashboard.stripe.com/register).
#### Server-side
This integration requires endpoints on your server that talk to the Stripe API. Use one official libraries for access to the Stripe API from your server. [Follow the steps here](https://stripe.com/docs/payments/accept-a-payment?platform=ios&ui=payment-sheet#setup-server-side)
#### Client-side
The Flutter SDK is open source, fully documented.
To install the SDK, follow these steps:
- Run the command `flutter pub add flutter_stripe`
- This will add a line like this to your project's pubspec.yaml with the latest package version
For details on the latest SDK release and past versions, see the [Releases](https://github.com/flutter-stripe/flutter_stripe/releases) page on GitHub. To receive notifications when a new release is published, [watch releases for the repository](https://docs.github.com/en/github/managing-subscriptions-and-notifications-on-github/managing-subscriptions-for-activity-on-github/viewing-your-subscriptions#watching-releases-for-a-repository).
When your app starts, configure the SDK with your Stripe [publishable key](https://dashboard.stripe.com/) so that it can make requests to the Stripe API.
```dart
void main() async {
Stripe.publishableKey = stripePublishableKey;
runApp(const App());
}
```
Use your [test mode](https://stripe.com/docs/keys#obtain-api-keys) keys while you test and develop, and your [live mode](https://stripe.com/docs/keys#test-live-modes) keys when you publish your app.
## 2. Add an endpoint [Server Side]
First, you need a Stripe account. [Register now](https://dashboard.stripe.com/register).
#### Server-side
This integration uses three Stripe API objects:
1. A [PaymentIntent](https://stripe.com/docs/api/payment_intents). Stripe uses this to represent your intent to collect payment from a customer, tracking your charge attempts and payment state changes throughout the process.
2. A [Customer](https://stripe.com/docs/api/customers) (optional). To set up a card for future payments, it must be attached to a Customer. Create a Customer object when your customer creates an account with your business. If your customer is making a payment as a guest, you can create a Customer object before payment and associate it with your own internal representation of the customer’s account later.
3. A Customer Ephemeral Key (optional). Information on the Customer object is sensitive, and can’t be retrieved directly from an app. An Ephemeral Key grants the SDK temporary access to the Customer.
>> If you never save cards to a Customer and don’t allow returning Customers to reuse saved cards, you can omit the Customer and Customer Ephemeral Key objects from your integration.
For security reasons, your app can’t create these objects. Instead, add an endpoint on your server that:
1. Retrieves the Customer, or creates a new one.
2. Creates an Ephemeral Key for the Customer.
3. Creates a PaymentIntent, passing the Customer id.
4. Returns the Payment Intent’s [client secret](https://stripe.com/docs/api/payment_intents/object#payment_intent_object-client_secret), the Ephemeral Key’s secret, and the Customer’s id to your app.
Check examples implementations for your server [here](https://stripe.com/docs/payments/accept-a-payment?platform=ios#add-server-endpoint)
## 3. Integrate the Payment Sheet [Client Side]
Before displaying the payment sheet, your checkout page should:
- Show the products being purchased and the total amount
- Collect any required shipping information
- Include a checkout button to present Stripe's UI
Next, integrate Stripe's prebuilt payment UI into your app's checkout.
### Initialize the Payment Sheet
First you need to initialize the payment sheet:
```dart
Future initPaymentSheet() async {
try {
// 1. Create payment intent on the server
final data = await _createPaymentSheet();
// 2. Create billing details (optional)
final billingDetails = BillingDetails(
name: 'Flutter Stripe',
email: 'email@stripe.com',
phone: '+48888000888',
address: Address(
city: 'Houston',
country: 'US',
line1: '1459 Circle Drive',
line2: '',
state: 'Texas',
postalCode: '77063',
),
);
// 3. Initialize the payment sheet
await Stripe.instance.initPaymentSheet(
paymentSheetParameters: SetupPaymentSheetParameters(
// Main params
paymentIntentClientSecret: data['paymentIntent'],
merchantDisplayName: 'Flutter Stripe Store Demo',
// Customer params
customerId: data['customer'],
customerEphemeralKeySecret: data['ephemeralKey'],
// Return URL for redirect-based payment methods
returnURL: 'flutterstripe://redirect',
// Extra options
primaryButtonLabel: 'Pay now',
applePay: PaymentSheetApplePay(
merchantCountryCode: 'US',
),
googlePay: PaymentSheetGooglePay(
merchantCountryCode: 'US',
testEnv: true,
),
style: ThemeMode.dark,
billingDetails: billingDetails,
),
);
} catch (e) {
ScaffoldMessenger.of(context).showSnackBar(
SnackBar(content: Text('Error: $e')),
);
rethrow;
}
}
```
### Present the Payment Sheet
When the customer taps a **Checkout** button, call `presentPaymentSheet` to display the payment sheet. After the customer completes the payment, the sheet is dismissed.
```dart
Future confirmPayment() async {
try {
await Stripe.instance.presentPaymentSheet();
ScaffoldMessenger.of(context).showSnackBar(
SnackBar(content: Text('Payment successfully completed')),
);
} on StripeException catch (e) {
ScaffoldMessenger.of(context).showSnackBar(
SnackBar(content: Text('Error from Stripe: ${e.error.localizedMessage}')),
);
}
}
```
### Custom Flow (Optional)
When you set `customFlow` to `true`, the payment sheet allows users to select a payment method first, then confirm the payment separately. This is useful when you want to show the selected payment method before confirming.
```dart
// 1. Initialize with customFlow: true
await Stripe.instance.initPaymentSheet(
paymentSheetParameters: SetupPaymentSheetParameters(
customFlow: true,
merchantDisplayName: 'Flutter Stripe Store Demo',
paymentIntentClientSecret: data['paymentIntent'],
customerEphemeralKeySecret: data['ephemeralKey'],
customerId: data['customer'],
),
);
// 2. Present the sheet to select a payment method
await Stripe.instance.presentPaymentSheet();
// 3. Confirm the payment when ready
await Stripe.instance.confirmPaymentSheetPayment();
```
Unless your business model requires immediate payment (e.g., an on-demand service), don't assume you have received payment at this point. Instead, inform the customer that you confirmed their order and notify them by email when you fulfill their order in the next step.
> **Note:** While cards finish payment immediately, other payment methods can take time to process. By not assuming you've received payment on the client, you can add additional payment methods in the future without updating your app.
## 4. Handle post-payment events
Stripe sends a [`payment_intent.succeeded`](https://stripe.com/docs/api/events/types#event_types-payment_intent.succeeded) event when the payment completes. Use the Dashboard, a custom webhook, or a partner solution to receive these events and run actions, like sending an order confirmation email to your customer, logging the sale in a database, or starting a shipping workflow.
Listen for these events rather than waiting on a callback from the client. On the client, the customer could close the browser window or quit the app before the callback executes. Setting up your integration to listen for asynchronous events also makes it easier to accept more payment methods in the future. Check out our [guide to payment methods](https://stripe.com/payments/payment-methods-guide) to see the differences between all supported payment methods.
## 5. Test the integration
Several test cards are available for you to use in test mode to make sure this integration is ready. Use them with any CVC, postal code, and future expiration date.
| NUMBER | DESCRIPTION |
| ------ | ------- |
| 4242424242424242 | Succeeds and immediately processes the payment. |
| 4000002500003155 | Requires authentication. Stripe will trigger a modal asking for the customer to authenticate. |
| 4000000000009995 | Always fails with a decline code of insufficient_funds. |
For the full list of test cards see the guide on [testing](https://stripe.com/docs/testing).
## 6. Optional - Enable Apple Pay (Only iOS)
#### Register for an Apple Merchant ID
Obtain an Apple Merchant ID by [registering for a new identifier](https://developer.apple.com/account/resources/identifiers/add/merchant) on the Apple Developer website.
Fill out the form with a description and identifier. Your description is for your own records and you can modify it in the future. Stripe recommends using the name of your app as the identifier (e.g., `merchant.com.{{YOUR_APP_NAME}}`).
#### Create a new Apple Pay certificate
Create a certificate for your app to encrypt payment data.
In the Dashboard’s [Apple Pay Settings](https://dashboard.stripe.com/settings/payments/apple_pay), click **Add new application** and follow the guide there.
#### Integrate with Xcode
Add the Apple Pay capability to your app. In Xcode, open your project settings, click the **Signing & Capabilities** tab, and add the **Apple Pay** capability. You might be prompted to log in to your developer account at this point. Select the merchant ID you created earlier, and your app is ready to accept Apple Pay.
Integrate Stripe’s prebuilt payment UI into the checkout of your app with the PaymentSheet class.
This integration combines all of the steps required to pay—collecting payment details and confirming the payment—into a single sheet that displays on top of your app.
## 1. Set up Stripe [Server Side] [Client Side]
First, you need a Stripe account. [Register now](https://dashboard.stripe.com/register).
#### Server-side
This integration requires endpoints on your server that talk to the Stripe API. Use one official libraries for access to the Stripe API from your server. [Follow the steps here](https://stripe.com/docs/payments/accept-a-payment?platform=ios&ui=payment-sheet#setup-server-side)
#### Client-side
The Flutter SDK is open source, fully documented.
To install the SDK, follow these steps:
- Run the command `flutter pub add flutter_stripe`
- This will add a line like this to your project's pubspec.yaml with the latest package version
For details on the latest SDK release and past versions, see the [Releases](https://github.com/flutter-stripe/flutter_stripe/releases) page on GitHub. To receive notifications when a new release is published, [watch releases for the repository](https://docs.github.com/en/github/managing-subscriptions-and-notifications-on-github/managing-subscriptions-for-activity-on-github/viewing-your-subscriptions#watching-releases-for-a-repository).
When your app starts, configure the SDK with your Stripe [publishable key](https://dashboard.stripe.com/) so that it can make requests to the Stripe API.
```dart
void main() async {
Stripe.publishableKey = stripePublishableKey;
runApp(const App());
}
```
Use your [test mode](https://stripe.com/docs/keys#obtain-api-keys) keys while you test and develop, and your [live mode](https://stripe.com/docs/keys#test-live-modes) keys when you publish your app.
## 2. Add an endpoint [Server Side]
First, you need a Stripe account. [Register now](https://dashboard.stripe.com/register).
#### Server-side
This integration uses three Stripe API objects:
1. A [PaymentIntent](https://stripe.com/docs/api/payment_intents). Stripe uses this to represent your intent to collect payment from a customer, tracking your charge attempts and payment state changes throughout the process.
2. A [Customer](https://stripe.com/docs/api/customers) (optional). To set up a card for future payments, it must be attached to a Customer. Create a Customer object when your customer creates an account with your business. If your customer is making a payment as a guest, you can create a Customer object before payment and associate it with your own internal representation of the customer’s account later.
3. A Customer Ephemeral Key (optional). Information on the Customer object is sensitive, and can’t be retrieved directly from an app. An Ephemeral Key grants the SDK temporary access to the Customer.
>> If you never save cards to a Customer and don’t allow returning Customers to reuse saved cards, you can omit the Customer and Customer Ephemeral Key objects from your integration.
For security reasons, your app can’t create these objects. Instead, add an endpoint on your server that:
1. Retrieves the Customer, or creates a new one.
2. Creates an Ephemeral Key for the Customer.
3. Creates a PaymentIntent, passing the Customer id.
4. Returns the Payment Intent’s [client secret](https://stripe.com/docs/api/payment_intents/object#payment_intent_object-client_secret), the Ephemeral Key’s secret, and the Customer’s id to your app.
Check examples implementations for your server [here](https://stripe.com/docs/payments/accept-a-payment?platform=ios#add-server-endpoint)
## 3. Integrate the Payment Sheet [Client Side]
Before displaying the payment sheet, your checkout page should:
- Show the products being purchased and the total amount
- Collect any required shipping information
- Include a checkout button to present Stripe's UI
Next, integrate Stripe's prebuilt payment UI into your app's checkout.
### Initialize the Payment Sheet
First you need to initialize the payment sheet:
```dart
Future initPaymentSheet() async {
try {
// 1. Create payment intent on the server
final data = await _createPaymentSheet();
// 2. Create billing details (optional)
final billingDetails = BillingDetails(
name: 'Flutter Stripe',
email: 'email@stripe.com',
phone: '+48888000888',
address: Address(
city: 'Houston',
country: 'US',
line1: '1459 Circle Drive',
line2: '',
state: 'Texas',
postalCode: '77063',
),
);
// 3. Initialize the payment sheet
await Stripe.instance.initPaymentSheet(
paymentSheetParameters: SetupPaymentSheetParameters(
// Main params
paymentIntentClientSecret: data['paymentIntent'],
merchantDisplayName: 'Flutter Stripe Store Demo',
// Customer params
customerId: data['customer'],
customerEphemeralKeySecret: data['ephemeralKey'],
// Return URL for redirect-based payment methods
returnURL: 'flutterstripe://redirect',
// Extra options
primaryButtonLabel: 'Pay now',
applePay: PaymentSheetApplePay(
merchantCountryCode: 'US',
),
googlePay: PaymentSheetGooglePay(
merchantCountryCode: 'US',
testEnv: true,
),
style: ThemeMode.dark,
billingDetails: billingDetails,
),
);
} catch (e) {
ScaffoldMessenger.of(context).showSnackBar(
SnackBar(content: Text('Error: $e')),
);
rethrow;
}
}
```
### Present the Payment Sheet
When the customer taps a **Checkout** button, call `presentPaymentSheet` to display the payment sheet. After the customer completes the payment, the sheet is dismissed.
```dart
Future confirmPayment() async {
try {
await Stripe.instance.presentPaymentSheet();
ScaffoldMessenger.of(context).showSnackBar(
SnackBar(content: Text('Payment successfully completed')),
);
} on StripeException catch (e) {
ScaffoldMessenger.of(context).showSnackBar(
SnackBar(content: Text('Error from Stripe: ${e.error.localizedMessage}')),
);
}
}
```
### Custom Flow (Optional)
When you set `customFlow` to `true`, the payment sheet allows users to select a payment method first, then confirm the payment separately. This is useful when you want to show the selected payment method before confirming.
```dart
// 1. Initialize with customFlow: true
await Stripe.instance.initPaymentSheet(
paymentSheetParameters: SetupPaymentSheetParameters(
customFlow: true,
merchantDisplayName: 'Flutter Stripe Store Demo',
paymentIntentClientSecret: data['paymentIntent'],
customerEphemeralKeySecret: data['ephemeralKey'],
customerId: data['customer'],
),
);
// 2. Present the sheet to select a payment method
await Stripe.instance.presentPaymentSheet();
// 3. Confirm the payment when ready
await Stripe.instance.confirmPaymentSheetPayment();
```
Unless your business model requires immediate payment (e.g., an on-demand service), don't assume you have received payment at this point. Instead, inform the customer that you confirmed their order and notify them by email when you fulfill their order in the next step.
> **Note:** While cards finish payment immediately, other payment methods can take time to process. By not assuming you've received payment on the client, you can add additional payment methods in the future without updating your app.
## 4. Handle post-payment events
Stripe sends a [`payment_intent.succeeded`](https://stripe.com/docs/api/events/types#event_types-payment_intent.succeeded) event when the payment completes. Use the Dashboard, a custom webhook, or a partner solution to receive these events and run actions, like sending an order confirmation email to your customer, logging the sale in a database, or starting a shipping workflow.
Listen for these events rather than waiting on a callback from the client. On the client, the customer could close the browser window or quit the app before the callback executes. Setting up your integration to listen for asynchronous events also makes it easier to accept more payment methods in the future. Check out our [guide to payment methods](https://stripe.com/payments/payment-methods-guide) to see the differences between all supported payment methods.
## 5. Test the integration
Several test cards are available for you to use in test mode to make sure this integration is ready. Use them with any CVC, postal code, and future expiration date.
| NUMBER | DESCRIPTION |
| ------ | ------- |
| 4242424242424242 | Succeeds and immediately processes the payment. |
| 4000002500003155 | Requires authentication. Stripe will trigger a modal asking for the customer to authenticate. |
| 4000000000009995 | Always fails with a decline code of insufficient_funds. |
For the full list of test cards see the guide on [testing](https://stripe.com/docs/testing).
## 6. Optional - Enable Apple Pay (Only iOS)
#### Register for an Apple Merchant ID
Obtain an Apple Merchant ID by [registering for a new identifier](https://developer.apple.com/account/resources/identifiers/add/merchant) on the Apple Developer website.
Fill out the form with a description and identifier. Your description is for your own records and you can modify it in the future. Stripe recommends using the name of your app as the identifier (e.g., `merchant.com.{{YOUR_APP_NAME}}`).
#### Create a new Apple Pay certificate
Create a certificate for your app to encrypt payment data.
In the Dashboard’s [Apple Pay Settings](https://dashboard.stripe.com/settings/payments/apple_pay), click **Add new application** and follow the guide there.
#### Integrate with Xcode
Add the Apple Pay capability to your app. In Xcode, open your project settings, click the **Signing & Capabilities** tab, and add the **Apple Pay** capability. You might be prompted to log in to your developer account at this point. Select the merchant ID you created earlier, and your app is ready to accept Apple Pay.
 #### Add Apple Pay
To add Apple Pay to PaymentSheet,
Make sure to set your Apple merchant ID `Stripe.merchantIdentifier` when you init stripe instance in your `main.dart`
[Check stripe docs](https://support.stripe.com/questions/enable-apple-pay-on-your-stripe-account) for enabling Apple Pay on your Stripe account & create merchantIdentifier
```dart
Stripe.publishableKey = stripePublishableKey;
Stripe.merchantIdentifier = 'merchant.flutter.stripe.test';
Stripe.urlScheme = 'flutterstripe';
await Stripe.instance.applySettings();
```
Then add `applePay: PaymentSheetApplePay()` with the country code of your business:
```dart
Stripe.instance.initPaymentSheet(
paymentSheetParameters: SetupPaymentSheetParameters(
merchantDisplayName: 'Flutter Stripe Store Demo',
//...
applePay: PaymentSheetApplePay(
merchantCountryCode: 'US',
buttonType: PlatformButtonType.buy, // Optional: customize button type
),
),
);
```
Available `buttonType` options include: `plain`, `buy`, `book`, `checkout`, `donate`, `order`, `pay`, `subscribe`, and more.
## 7. Optional - Enable Google Pay (Only Android)
#### Set up your integration
To use Google Pay, first enable the Google Pay API by adding the following to the `` tag of your AndroidManifest.xml:
AndroidManifest.xml
```xml
...
```
This guide assumes you’re using the latest version of the Stripe Android SDK.
For more details, see Google Pay’s Set up Google Pay API for Android.
#### Add Google Pay
To add Google Pay to your integration, set `googlePay: PaymentSheetGooglePay()` and specify the country code of your business within that.
```dart
Stripe.instance.initPaymentSheet(
paymentSheetParameters: SetupPaymentSheetParameters(
merchantDisplayName: 'Flutter Stripe Store Demo',
//...
googlePay: PaymentSheetGooglePay(
merchantCountryCode: 'US',
testEnv: true,
buttonType: PlatformButtonType.book, // Optional: customize button type
),
),
);
```
Available `buttonType` options include: `plain`, `buy`, `book`, `checkout`, `donate`, `order`, `pay`, `subscribe`, and more.
## 8. Optional - Enable Card Scanning (Only iOS)
To enable card scanning support, set the `NSCameraUsageDescription` **(Privacy - Camera Usage Description)** in the Info.plist of your application, and provide a reason for accessing the camera (e.g., “To scan cards”). Devices with iOS 13 or higher support card scanning.
## 9. Optional - Customize the Sheet
All customization is configured through the `SetupPaymentSheetParameters` object.
### Merchant Display Name
You can specify a customer-facing business name that Stripe uses to display a "Pay (merchantDisplayName)" line item in the payment sheet. By default, this is your app's name.
```dart
Stripe.instance.initPaymentSheet(
paymentSheetParameters: SetupPaymentSheetParameters(
merchantDisplayName: 'Flutter Stripe Store Demo',
// ... other parameters
),
);
```
### Primary Button Label
Customize the text on the primary payment button:
```dart
Stripe.instance.initPaymentSheet(
paymentSheetParameters: SetupPaymentSheetParameters(
primaryButtonLabel: 'Pay now',
// ... other parameters
),
);
```
### Preferred Card Networks
Specify preferred card networks to prioritize when multiple networks are available:
```dart
Stripe.instance.initPaymentSheet(
paymentSheetParameters: SetupPaymentSheetParameters(
preferredNetworks: [CardBrand.Visa, CardBrand.Amex],
// ... other parameters
),
);
```
### Pre-fill Billing Details
Pre-fill the billing details form with customer information:
```dart
Stripe.instance.initPaymentSheet(
paymentSheetParameters: SetupPaymentSheetParameters(
billingDetails: BillingDetails(
name: 'John Doe',
email: 'john@example.com',
phone: '+1234567890',
address: Address(
city: 'Houston',
country: 'US',
line1: '1459 Circle Drive',
line2: '',
state: 'Texas',
postalCode: '77063',
),
),
// ... other parameters
),
);
```
### Change Appearance
You can customize the appearance of the payment sheet:
```dart
await Stripe.instance.initPaymentSheet(
paymentSheetParameters: SetupPaymentSheetParameters(
merchantDisplayName: 'Flutter Stripe Store Demo',
paymentIntentClientSecret: data['paymentIntent'],
appearance: PaymentSheetAppearance(
colors: PaymentSheetAppearanceColors(
background: Colors.lightBlue,
primary: Colors.blue,
componentBorder: Colors.red,
),
shapes: PaymentSheetShape(
borderWidth: 4,
shadow: PaymentSheetShadowParams(color: Colors.red),
),
primaryButton: PaymentSheetPrimaryButtonAppearance(
shapes: PaymentSheetPrimaryButtonShape(blurRadius: 8),
colors: PaymentSheetPrimaryButtonTheme(
light: PaymentSheetPrimaryButtonThemeColors(
background: Color.fromARGB(255, 231, 235, 30),
text: Color.fromARGB(255, 235, 92, 30),
border: Color.fromARGB(255, 235, 92, 30),
),
),
),
),
),
);
```
## 10. Return URL Configuration
For redirect-based payment methods (like bank redirects), you need to configure a return URL to bring users back to your app after authentication.
### iOS Configuration
Add a custom URL scheme to your `Info.plist`:
```xml
CFBundleURLTypes
CFBundleTypeRole
Editor
CFBundleURLName
flutterstripe
CFBundleURLSchemes
flutterstripe
```
### Android Configuration
Add an intent filter to your `AndroidManifest.xml`:
```xml
```
### Set URL Scheme in Stripe
Configure the URL scheme when initializing Stripe:
```dart
Stripe.publishableKey = stripePublishableKey;
Stripe.urlScheme = 'flutterstripe';
await Stripe.instance.applySettings();
```
Then use a matching `returnURL` in your payment sheet:
```dart
await Stripe.instance.initPaymentSheet(
paymentSheetParameters: SetupPaymentSheetParameters(
returnURL: 'flutterstripe://redirect',
// ... other parameters
),
);
```
#### Add Apple Pay
To add Apple Pay to PaymentSheet,
Make sure to set your Apple merchant ID `Stripe.merchantIdentifier` when you init stripe instance in your `main.dart`
[Check stripe docs](https://support.stripe.com/questions/enable-apple-pay-on-your-stripe-account) for enabling Apple Pay on your Stripe account & create merchantIdentifier
```dart
Stripe.publishableKey = stripePublishableKey;
Stripe.merchantIdentifier = 'merchant.flutter.stripe.test';
Stripe.urlScheme = 'flutterstripe';
await Stripe.instance.applySettings();
```
Then add `applePay: PaymentSheetApplePay()` with the country code of your business:
```dart
Stripe.instance.initPaymentSheet(
paymentSheetParameters: SetupPaymentSheetParameters(
merchantDisplayName: 'Flutter Stripe Store Demo',
//...
applePay: PaymentSheetApplePay(
merchantCountryCode: 'US',
buttonType: PlatformButtonType.buy, // Optional: customize button type
),
),
);
```
Available `buttonType` options include: `plain`, `buy`, `book`, `checkout`, `donate`, `order`, `pay`, `subscribe`, and more.
## 7. Optional - Enable Google Pay (Only Android)
#### Set up your integration
To use Google Pay, first enable the Google Pay API by adding the following to the `` tag of your AndroidManifest.xml:
AndroidManifest.xml
```xml
...
```
This guide assumes you’re using the latest version of the Stripe Android SDK.
For more details, see Google Pay’s Set up Google Pay API for Android.
#### Add Google Pay
To add Google Pay to your integration, set `googlePay: PaymentSheetGooglePay()` and specify the country code of your business within that.
```dart
Stripe.instance.initPaymentSheet(
paymentSheetParameters: SetupPaymentSheetParameters(
merchantDisplayName: 'Flutter Stripe Store Demo',
//...
googlePay: PaymentSheetGooglePay(
merchantCountryCode: 'US',
testEnv: true,
buttonType: PlatformButtonType.book, // Optional: customize button type
),
),
);
```
Available `buttonType` options include: `plain`, `buy`, `book`, `checkout`, `donate`, `order`, `pay`, `subscribe`, and more.
## 8. Optional - Enable Card Scanning (Only iOS)
To enable card scanning support, set the `NSCameraUsageDescription` **(Privacy - Camera Usage Description)** in the Info.plist of your application, and provide a reason for accessing the camera (e.g., “To scan cards”). Devices with iOS 13 or higher support card scanning.
## 9. Optional - Customize the Sheet
All customization is configured through the `SetupPaymentSheetParameters` object.
### Merchant Display Name
You can specify a customer-facing business name that Stripe uses to display a "Pay (merchantDisplayName)" line item in the payment sheet. By default, this is your app's name.
```dart
Stripe.instance.initPaymentSheet(
paymentSheetParameters: SetupPaymentSheetParameters(
merchantDisplayName: 'Flutter Stripe Store Demo',
// ... other parameters
),
);
```
### Primary Button Label
Customize the text on the primary payment button:
```dart
Stripe.instance.initPaymentSheet(
paymentSheetParameters: SetupPaymentSheetParameters(
primaryButtonLabel: 'Pay now',
// ... other parameters
),
);
```
### Preferred Card Networks
Specify preferred card networks to prioritize when multiple networks are available:
```dart
Stripe.instance.initPaymentSheet(
paymentSheetParameters: SetupPaymentSheetParameters(
preferredNetworks: [CardBrand.Visa, CardBrand.Amex],
// ... other parameters
),
);
```
### Pre-fill Billing Details
Pre-fill the billing details form with customer information:
```dart
Stripe.instance.initPaymentSheet(
paymentSheetParameters: SetupPaymentSheetParameters(
billingDetails: BillingDetails(
name: 'John Doe',
email: 'john@example.com',
phone: '+1234567890',
address: Address(
city: 'Houston',
country: 'US',
line1: '1459 Circle Drive',
line2: '',
state: 'Texas',
postalCode: '77063',
),
),
// ... other parameters
),
);
```
### Change Appearance
You can customize the appearance of the payment sheet:
```dart
await Stripe.instance.initPaymentSheet(
paymentSheetParameters: SetupPaymentSheetParameters(
merchantDisplayName: 'Flutter Stripe Store Demo',
paymentIntentClientSecret: data['paymentIntent'],
appearance: PaymentSheetAppearance(
colors: PaymentSheetAppearanceColors(
background: Colors.lightBlue,
primary: Colors.blue,
componentBorder: Colors.red,
),
shapes: PaymentSheetShape(
borderWidth: 4,
shadow: PaymentSheetShadowParams(color: Colors.red),
),
primaryButton: PaymentSheetPrimaryButtonAppearance(
shapes: PaymentSheetPrimaryButtonShape(blurRadius: 8),
colors: PaymentSheetPrimaryButtonTheme(
light: PaymentSheetPrimaryButtonThemeColors(
background: Color.fromARGB(255, 231, 235, 30),
text: Color.fromARGB(255, 235, 92, 30),
border: Color.fromARGB(255, 235, 92, 30),
),
),
),
),
),
);
```
## 10. Return URL Configuration
For redirect-based payment methods (like bank redirects), you need to configure a return URL to bring users back to your app after authentication.
### iOS Configuration
Add a custom URL scheme to your `Info.plist`:
```xml
CFBundleURLTypes
CFBundleTypeRole
Editor
CFBundleURLName
flutterstripe
CFBundleURLSchemes
flutterstripe
```
### Android Configuration
Add an intent filter to your `AndroidManifest.xml`:
```xml
```
### Set URL Scheme in Stripe
Configure the URL scheme when initializing Stripe:
```dart
Stripe.publishableKey = stripePublishableKey;
Stripe.urlScheme = 'flutterstripe';
await Stripe.instance.applySettings();
```
Then use a matching `returnURL` in your payment sheet:
```dart
await Stripe.instance.initPaymentSheet(
paymentSheetParameters: SetupPaymentSheetParameters(
returnURL: 'flutterstripe://redirect',
// ... other parameters
),
);
```