# Installation
```bash
# Install the admob module (COMING SOON)
# yarn add @invertase/react-native-google-ads
# For the time being (as there is no NPM package available yet)
# add the following entry to your package.json and run yarn
"react-native-google-ads": "github:invertase/react-native-google-ads"
```
> On Android, before releasing your app, you must select _Yes, my app contains ads_ in the Google Play Store, Policy, App content, Manage under Ads.
# What does it do
The AdMob module allows you to display adverts to your users. All adverts are served over the Google AdMob network, meaning
a [Google AdMob account](https://apps.admob.com) is required.
The module supports three types of Ads:
1. Full screen [Interstitial Ads](/displaying-ads#interstitial-ads).
2. Full screen [Rewarded Ads](/displaying-ads#rewarded-ads).
3. Component based [Banner Ads](/displaying-ads#banner-ads).
# Getting Started
A number of steps must be taken and considered before you start serving adverts to your users:
- [Installation](#installation)
- [Getting Started](#getting-started)
- [Setting up Google AdMob](#setting-up-google-admob)
- [Configure outbound requests](#configure-outbound-requests)
- [European User Consent](#european-user-consent)
- [Test ads](#test-ads)
- [Next Steps](#next-steps)
## Setting up Google AdMob
Before you are able to display ads to your users, you must have a [Google AdMob account](https://apps.admob.com). Under the
"Apps" menu item, create or choose an existing Android/iOS app. Each app platform exposes a unique account ID which needs to
be added to the project.
> Attempting to build your app without a valid App ID may cause a crash during build.
Under the "App settings" menu item, you can find the "App ID":
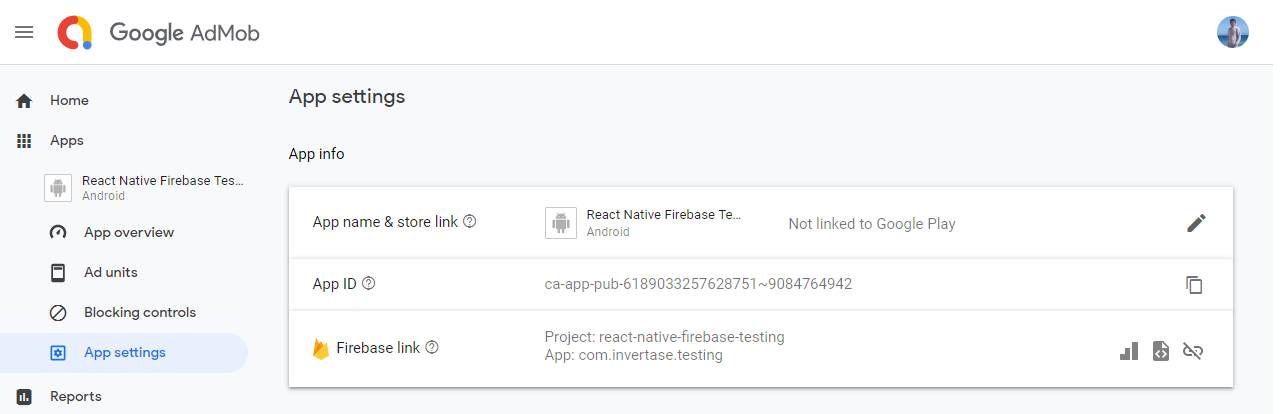
Within the root of your React Native project, open the `app.json` file and add the
`android_app_id` & `ios_app_id` keys with the IDs from the Google AdMob console:
```json
// /app.json
{
"react-native-google-ads": {
"android_app_id": "ca-app-pub-xxxxxxxx~xxxxxxxx",
"ios_app_id": "ca-app-pub-xxxxxxxx~xxxxxxxx"
}
}
```
For the changes to take effect, rebuild your project:
```bash
# For iOS
cd ios/ && pod install
npx react-native run-ios
# For Android
npx react-native run-android
```
## Configure outbound requests
Before requesting ads, you must tell the AdMob network what type of content you'd wish to receive based on your target
audience.
For example, if the application targets children then you must configure the outbound requests to only
receive content suitable for children before loading any adverts.
To set the request configuration, call the `setRequestConfiguration` method:
```js
import admob, { MaxAdContentRating } from 'react-native-google-ads';
admob()
.setRequestConfiguration({
// Update all future requests suitable for parental guidance
maxAdContentRating: MaxAdContentRating.PG,
// Indicates that you want your content treated as child-directed for purposes of COPPA.
tagForChildDirectedTreatment: true,
// Indicates that you want the ad request to be handled in a
// manner suitable for users under the age of consent.
tagForUnderAgeOfConsent: true,
})
.then(() => {
// Request config successfully set!
});
```
To learn more about the request configuration settings, view the [`RequestConfiguration`](/reference/admob/requestconfiguration) documentation.
## European User Consent
Out of the box, AdMob does not handle any related regulations which you may need to enforce on your application.
It is up to the developer to implement and handle this on a user-by-user basis. You must consent to EEA users
being served both personalized and non-personalized adverts before showing them. For more information, see
[Requesting Consent from European Users](https://developers.google.com/admob/android/eu-consent).
The AdMob module provides a `AdConsent` helper to help developers quickly implement consent flows within their application.
See the [European User Consent page](/european-user-consent) for full examples of how to integrate the helper into your application.
## Test ads
Whilst developing your app with AdMob, you'll want to make sure you use test ads rather than production ads from your
Google AdMob account - otherwise your account may be disabled!
Although usage of different advert types is explained later, when creating your adverts the "Ad Unit ID" being used whilst
testing can be set to a testing ID. The code snippet below shows how to initialize each advert type with a test ID:
```jsx
import { InterstitialAd, RewardedAd, BannerAd, TestIds } from 'react-native-google-ads';
# Interstitial
InterstitialAd.createForAdRequest(TestIds.INTERSTITIAL);
# Rewarded
RewardedAd.createForAdRequest(TestIds.REWARDED);
# Banners
```
# Next Steps
Now the basics of setting up and configuring AdMob have been explained, we can go ahead and start to display different
adverts to our users. The AdMob module provides integration with three different types:
- [Interstitial Ads](/displaying-ads#interstitial-ads)
- [Rewarded Ads](/displaying-ads#rewarded-ads)
- [Banner Ads](/displaying-ads#banner-ads)