Interactive Widgets
Android and iOS (starting with iOS 17) allow widgets to have interactive Elements like Buttons. Using home_widget you can register Dart Callbacks that get invoked from the Native Widgets so you only have to write that logic once.

Flutter Setup
-
Write a static function that takes a Uri as an argument. This will get called when a user clicks on the View
@pragma("vm:entry-point") FutureOr<void> backgroundCallback(Uri? data) async { // do something with data ... }@pragma('vm:entry-point')must be placed above thecallbackfunction to avoid tree shaking in release mode. -
Register the callback function by calling
HomeWidget.registerInteractivityCallback(backgroundCallback);
CocoaPods
If you manage your iOS dependencies with CocoaPods, adjust your Podfile to add home_widget as a dependency to your WidgetExtension:
target 'YourWidgetExtension' do
   use_frameworks!
   use_modular_headers!

   pod 'home_widget', :path => '.symlinks/plugins/home_widget/ios'
end
Swift Package Manager
If you integrate plugins with Swift Package Manager, make sure your WidgetExtension links against the generated Flutter plugin package:
- Open your Flutter project's
Runner.xcworkspacein Xcode and select your WidgetExtension target. - On the
Generaltab, locate theFrameworks and Librariessection and click the+button.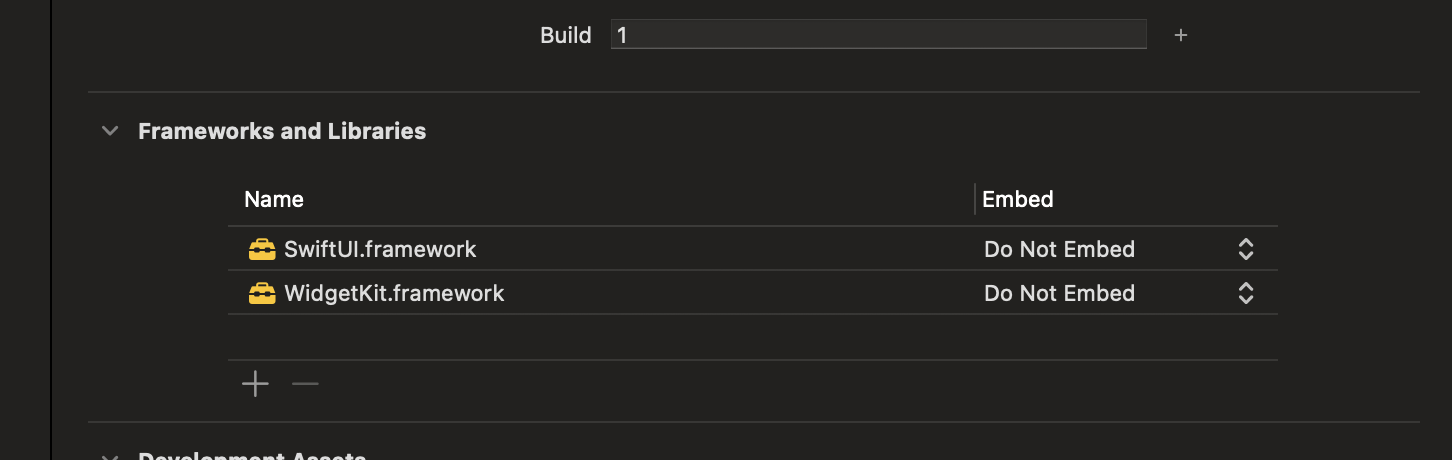
- In the picker that appears, choose
FlutterGeneratedPluginSwiftPackageand confirm. If it is not available you need to runflutter pub get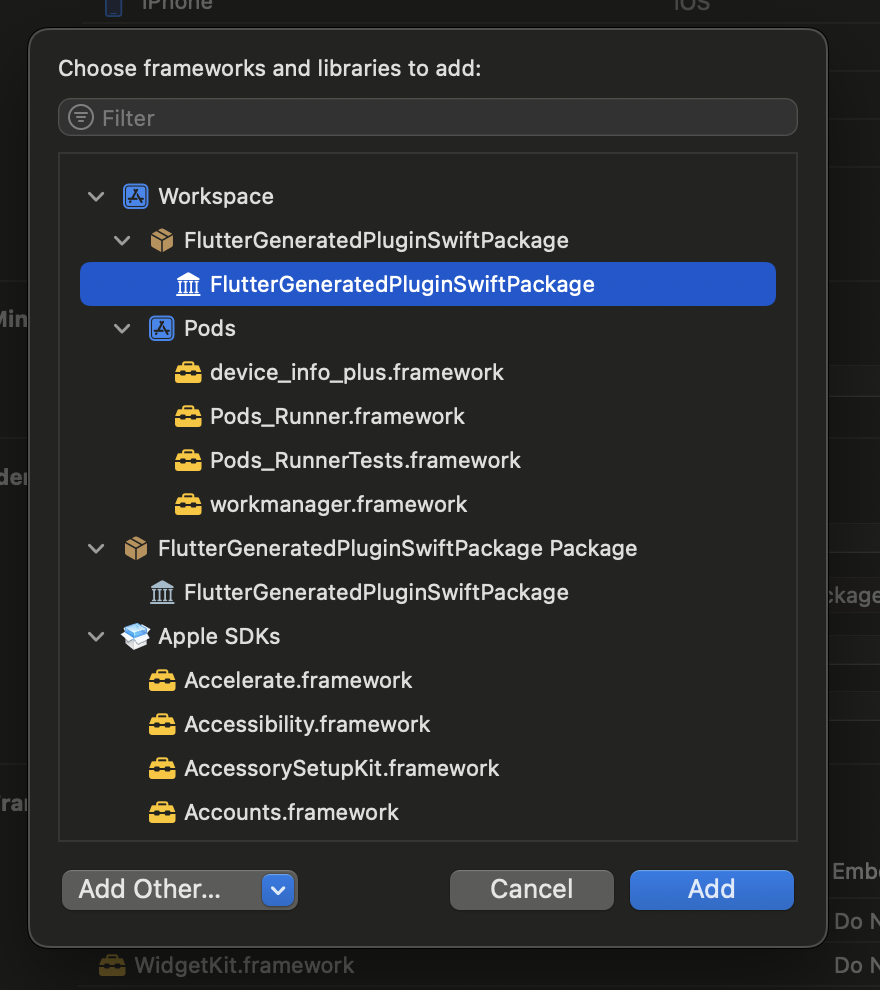
Once the dependency is present in your widget target, continue with the shared setup steps below.
Common Steps
-
To be able to use plugins with the Background Callback add this to your AppDelegate's
applicationfunctionif #available(iOS 17, *) { HomeWidgetBackgroundWorker.setPluginRegistrantCallback { registry in GeneratedPluginRegistrant.register(with: registry) } } -
Create a custom
AppIntentin your App Target (Runner) and make sure to select both your App and your WidgetExtension in the Target Membership panel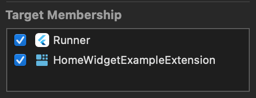
In this Intent you should import
home_widgetand callHomeWidgetBackgroundWorker.run(url: url, appGroup: appGroup!)in the perform method.urlandappGroupcan be either hardcoded or set as parameters from the Widgetimport AppIntents import Flutter import Foundation import home_widget @available(iOS 16, *) public struct BackgroundIntent: AppIntent { static public var title: LocalizedStringResource = "HomeWidget Background Intent" @Parameter(title: "Widget URI") var url: URL? @Parameter(title: "AppGroup") var appGroup: String? public init() {} public init(url: URL?, appGroup: String?) { self.url = url self.appGroup = appGroup } public func perform() async throws -> some IntentResult { await HomeWidgetBackgroundWorker.run(url: url, appGroup: appGroup!) return .result() } } -
Add a Button to your Widget. This Button might be encapsulated by a Version check. Pass in an instance of the
AppIntentcreated in the previous stepButton( intent: BackgroundIntent( url: URL(string: "homeWidgetExample://titleClicked"), appGroup: widgetGroupId) ) { Text(entry.title).bold().font( /*@START_MENU_TOKEN@*/.title /*@END_MENU_TOKEN@*/) }.buttonStyle(.plain) -
With the current setup the Widget is now Interactive as long as the App is still in the background. If you want to have the Widget be able to wake the App up you need to add the following to your
AppIntentfile@available(iOS 16, *) @available(iOSApplicationExtension, unavailable) extension BackgroundIntent: ForegroundContinuableIntent {}This code tells the system to always perform the Intent in the App and not in a process attached to the Widget. Note however that this will start your Flutter App using the normal main entrypoint meaning your full app might be run in the background. To counter this you should add checks in the very first Widget you build inside
runAppto only perform necessary calls/setups while the App is launched in the background
Android Setup
- Add the necessary Receiver to your
AndroidManifest.xmlfile<receiver android:name="es.antonborri.home_widget.HomeWidgetBackgroundReceiver" android:exported="true"> <intent-filter> <action android:name="es.antonborri.home_widget.action.BACKGROUND" /> </intent-filter> </receiver> - Create a custom Action
class InteractiveAction : ActionCallback { override suspend fun onAction(context: Context, glanceId: GlanceId, parameters: ActionParameters) { val backgroundIntent = HomeWidgetBackgroundIntent.getBroadcast(context, Uri.parse("homeWidgetExample://titleClicked")) backgroundIntent.send() } } - Add the Action as a modifier to a view
Text(
     title,
     style = TextStyle(fontSize = 36.sp, fontWeight = FontWeight.Bold),
     modifier = GlanceModifier.clickable(onClick = actionRunCallback<InteractiveAction>()),
)
Example Blog Article
A more in depth guide on how to build Interactive Widgets can be found here