
What is QML
QML stands for Qt Modeling Language. It is a declaritive language designed for creating modern user interfaces / experiences.
Where is QML used?
QML is used in many different environments. From desktop, to mobile and even embedded systems (remember this is Qt).
Bellow is are a few examples of QML in the wild:
What does QML look like?
Want to see some code? This is pretty much the simplest example of QML you can find.
// HelloWorld.qml
import QtQuick
Text {
    text: 'Hello World'
}
A side note on QML examples in this tutorial series
Above is the first of many QML code examples you will see throughout this tutorial series.
If you are browsing these docs using a normal HTML browser it is worth taking a momement to explain how to view and play with the examples you will come across during this tutorial series.
All QML examples that you will come across in these docs are stored here in GitHub. Since these files are publicly hosted they can be viewed with Canonic! Just open Canonic and enter the url of the raw qml file for the example you want to view into the addressbar.
For the above
HelloWorld.qmlexample you would enter https://raw.githubusercontent.com/canonic/canonic/main/docs/examples/HelloWorld.qml into Canonic's address bar.Or just click the View in Canonic button under each example.
Note: you can also copy paste any example into the Canonic Playground editor for an interactive live preview.
The QML syntax follows the general rule of:
<ComponentName> {
    <propertyName>: <propertyValue>
}
Where:
<ComponentName>is the name of some type of QML component type.<propertyName>is the name of a property of that component type<propertyValue>is simply some kind of JS value like a number or a string.
Almost every QML file will also contain import QtQuick before <ComponentName> just like with the simple HelloWorld.qml example above. This is a module import statement which is used for importing QML component types defined in other files (among other things). You can also have an optional version number after the module name. There are lots of different modules that come with Qt by default for things like viewing 3D content, multimedia, charts, etc. but the QtQuick module contains all of the most basic QML components that you will be using all the time to begin with like Text, Rectangle, Image, MouseArea, etc..
If you've been reading about QML online you may have actually seen the terms QtQuick and QML used interchangeably but as you can now see there is a difference between the two. QML is the language and QtQuick is a module that happens to get used almost all of the time.
A more complex example
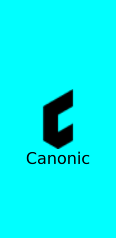
// CanonicRectangle.qml
import QtQuick

Rectangle {
    // Give this element the id: root
    id: root

    // Bind the properties width and height: <name>: <value>
    width: 120
    height: 240

    // Set the background color of the Rectangle
    color: "cyan"

    // Declare a nested element (child of root)
    Image {
        id: image

        // Position the image in the horizontal center of the
        // parent element using absolute positioning
        x: (parent.width - width)/2

        // Position the image in the vertical center of the
        // parent element using anchors
        anchors.verticalCenter: parent.verticalCenter

        fillMode: Image.PreserveAspectFit

        width: 60
        height: 60

        // Load an image from a url
        source: 'https://www.canonic.com/assets/images/favicon.png'
    }

    // Another child of root
    Text {
        // un-named element

        // Position the text so that its top is anchored to
        // the bottom of the image element
        anchors.top: image.bottom

        anchors.horizontalCenter: image.horizontalCenter

        text: 'Canonic'
    }
}
The above is a slightly more complicated example which shows off how to use a Rectangle element to set a background colour and how one element can contain multiple other sub-elements (in this case an Image element and a Text element).
Notice how we are able to give unique id's to elements and then reference those elements when binding the value of properties throughout the example.
For instance the Text child element uses anchors.top: image.bottom to position the itself below the Image element with the id image. Making use of anchors like this is a common way to position elements relative to other elements in a QML scene.
It is also possible to position an element by manually setting its x or y property. You can see this in the example in the case of the image element which binds its x property to (parent.width - width)/2.
A note on Bindings
When a property is given a value using the <property>: <value> syntax, like we see in all the properties in the above example, we call this a property binding.
This is different to setting the value for a variable like with other programming langauges as a property binding will be re-evaluated whenever one of its referenced values changes.
For example the x: (parent.width - width)/2 property binding for the image element references the width property of itself and its parent. If either the parent or image element's width property changes then the binding will be re-evalutated, causing the image element to always be horizontally centered inside its parent!
Binding loops
If two properties use bindings that reference each other then it is possible to end up in a binding loop situation. The QML runtime will throw a error in these cases but will try to continue. Nevertheless it is best to make sure you don't bind two properties to each other directly or indirectly to avoid these binding loops.