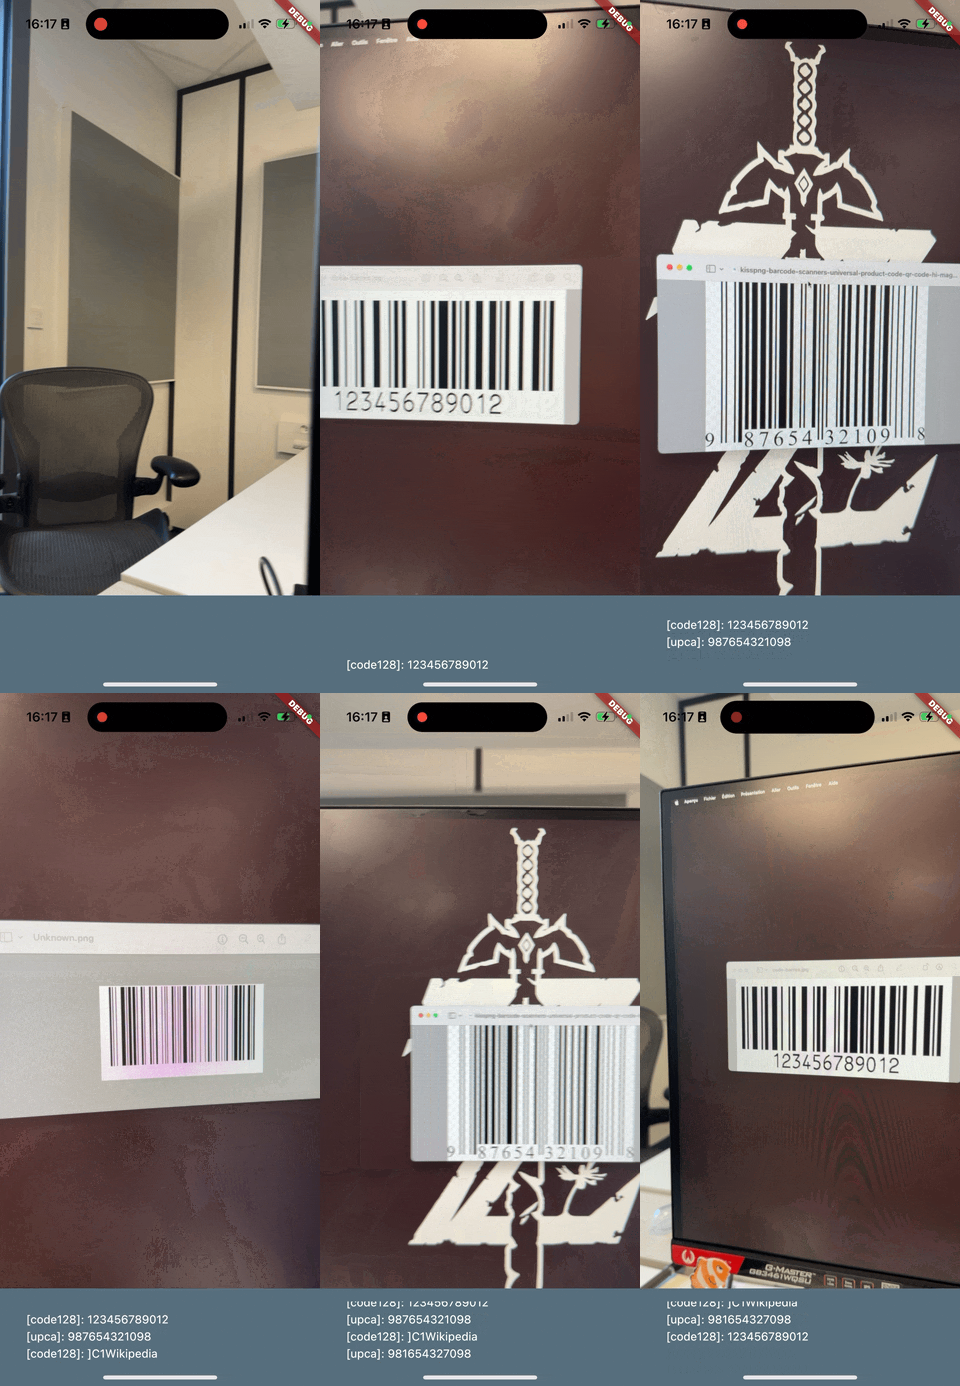
Reading barcodes

First thing you need to do is adding MLKit's barcode scanner to your pubspec.yaml:
google_mlkit_barcode_scanning: ^0.12.0
You will need a BarcodeScanner. You can get one with:
final _barcodeScanner = BarcodeScanner(formats: [BarcodeFormat.all]);
You might not want to read all BarcodeFormat, so feel free to be more selective.
Now you can set up CamerAwesome.
Setting up CamerAwesome
This is the builder of the ai_analysis_barcode.dart example:
// 1.
CameraAwesomeBuilder.previewOnly(
  // 2.
  imageAnalysisConfig: AnalysisConfig(
    androidOptions: const AndroidAnalysisOptions.nv21(
      width: 1024,
    ),
    maxFramesPerSecond: 5,
    autoStart: false,
  ),
  // 3.
  onImageForAnalysis: (img) => _processImageBarcode(img),
  // 4.
  builder: (cameraModeState, preview) {
    return _BarcodeDisplayWidget(
      barcodesStream: _barcodesStream,
      scrollController: _scrollController,
      // 5.
      analysisController: cameraModeState.analysisController!,
    );
  },
)
Let's go through this code snippet:
- We use the
previewOnly()constructor since we don't need to take pictures or videos. We only need to analyze images. - The
AnalysisConfigfor this example includes amaxFramesPerSecondto a low value since we only need to read barcodes. It doesn't make sense to read 10s of barcodes per second. It reduces the number of calculations greatly. - We set the
onImageForAnalysiscallback to our_processImageBarcodemethod. - We build our interface with the
builder. Here, we simply made a widget that displays all the barcodes scanned in aListView. - The
analysisControllerwill be used to pause and resume image analysis.
Extract barcodes from AnalysisImage
Once you get an AnalysisImage, you need to convert it to an object that MLKit can handle then you can do your processing.
Future _processImageBarcode(AnalysisImage img) async {
  // 1.
  final inputImage = img.toInputImage();

  try {
    // 2.
    var recognizedBarCodes = await _barcodeScanner.processImage(inputImage);
    // 3.
    for (Barcode barcode in recognizedBarCodes) {
      debugPrint("Barcode: [${barcode.format}]: ${barcode.rawValue}");
      // 4.
      _addBarcode("[${barcode.format.name}]: ${barcode.rawValue}");
    }
  } catch (error) {
    debugPrint("...sending image resulted error $error");
  }
}
Here is an explanation of the above code:
- Convert the
AnalysisImageto anInputImagewithtoInputImage(),a function from an extension that we'll detail later. - Process the image with the
BarcodeScannerand get the barcodes. - Loop through the barcodes.
- Add the barcode to the list of barcodes.
The extension function toInputImage() is the following:
import 'package:camerawesome/camerawesome_plugin.dart';
import 'package:google_mlkit_face_detection/google_mlkit_face_detection.dart';

extension MLKitUtils on AnalysisImage {
  InputImage toInputImage() {
    // 1.
    final planeData =
        when(nv21: (img) => img.planes, bgra8888: (img) => img.planes)?.map(
      (plane) {
        return InputImagePlaneMetadata(
          bytesPerRow: plane.bytesPerRow,
          height: height,
          width: width,
        );
      },
    ).toList();

    // 2.
    return when(nv21: (image) {
      // 3.
      return InputImage.fromBytes(
        bytes: image.bytes,
        metadata: InputImageMetadata(
            rotation: inputImageRotation,
            format: InputImageFormat.nv21,
            size: image.size,
            bytesPerRow: image.planes.first.bytesPerRow,
        ),
      );
    }, bgra8888: (image) {
      // 4.
      final inputImageData = InputImageData(
        size: size,
        imageRotation: inputImageRotation,
        inputImageFormat: inputImageFormat,
        planeData: planeData,
      );

      // 5.
      return InputImage.fromBytes(
        bytes: image.bytes,
        inputImageData: inputImageData,
      );
    })!;
  }

  InputImageRotation get inputImageRotation =>
      InputImageRotation.values.byName(rotation.name);

  InputImageFormat get inputImageFormat {
    switch (format) {
      case InputAnalysisImageFormat.bgra8888:
        return InputImageFormat.bgra8888;
      case InputAnalysisImageFormat.nv21:
        return InputImageFormat.nv21;
      default:
        return InputImageFormat.yuv420;
    }
  }
}
Let's break down this extension function:
- Get the planes from the
AnalysisImageand map them toInputImagePlaneMetadata. - Use the
when()function to handle both Android and iOS cases. - Convert the
Nv21Imageto MLKit'sInputImage - Define the
InputImageDatafor theInputImageon iOS. - Convert the
Bgra8888Imageto MLKit'sInputImagethanks toInputImageData.
There are also helper function to map enums between CamerAwesome and MLKit.
Detecting barcodes is quite straightforward with CamerAwesome and MLKit.
You just need to convert AnalysisImage to an InputImage as it is done in this example and MLKit will handle the rest. 👌
Pause and Resume Image Analysis
You may want to pause and resume image analysis.
To do that, CamerAwesome provides an AnalysisController through CameraState:
// 1.
CameraAwesomeBuilder.custom(
    builder: (cameraState, preview) {
        // 2.
        print("Image analysis enabled: ${cameraState.analysisController?.enabled}");

        return SomeWidget(
            analysisController: cameraState.analysisController,
        );
    },
)
The above code shows a simple way to access the AnalysisController:
- We used the
custom()constructor here but you can also get one from theawesome()constructor. Note that it may be null if no image analysis callback has been set. - Here, we only print if the image analysis is enabled or not thanks to
analysisController.
Then, you could have a toggle widget like this:
CheckboxListTile(
    value: widget.analysisController.enabled,
    onChanged: (_) async {
        // 1.
        if (widget.analysisController?.enabled == true) {
          // 2.
          await widget.analysisController.stop();
        } else {
          // 3.
          await widget.analysisController.start();
        }
        setState(() {});
    },
    title: Text("Enable barcode scan"),
)
As a toggle, it swap between image analysis enabled and disabled:
- First, check if it was enabled or disabled
- If it was enabled, disable image analysis
- Otherwise, enable it
See the complete example if you need more details.
Scan area
While scanning barcodes, you may want to limit the area where to look for barcodes. This is possible with CamerAwesome. Let's see how.
Showing the scan area
First of all, you must show the area in which you want to scan barcodes.
You can use CameraAwesomeBuilder.awesome() to do that thanks to the previewDecoratorBuilder parameter:
CameraAwesomeBuilder.awesome(
    previewDecoratorBuilder: (state, preview) {
        return BarcodePreviewOverlay(
          state: state,
          previewSize: preview.size,
          previewRect: preview.rect,
          barcodes: _barcodes,
          analysisImage: _image,
        );
    },
    // Other parameters
)
Other builders of
CameraAwesomeBuilderprovide a similar feature with theirbuilderparameter.
The above code is taken from preview_overlay_example.dart.
The previewDecoratorBuilder gives you three important parameters:
- the
stateof the camera - the
previewSizeof the camera, before any clipping due to the current aspectRatio - the
previewRectof the camera, after any clipping due to the aspectRatio
The native preview may not respect the selected aspect ratio, so we clip it to correct this behaviour. That's why there are two distinct parameters.
Then, pass these parameters to your decorator widget along with the AnalysisImage and the barcodes detected.
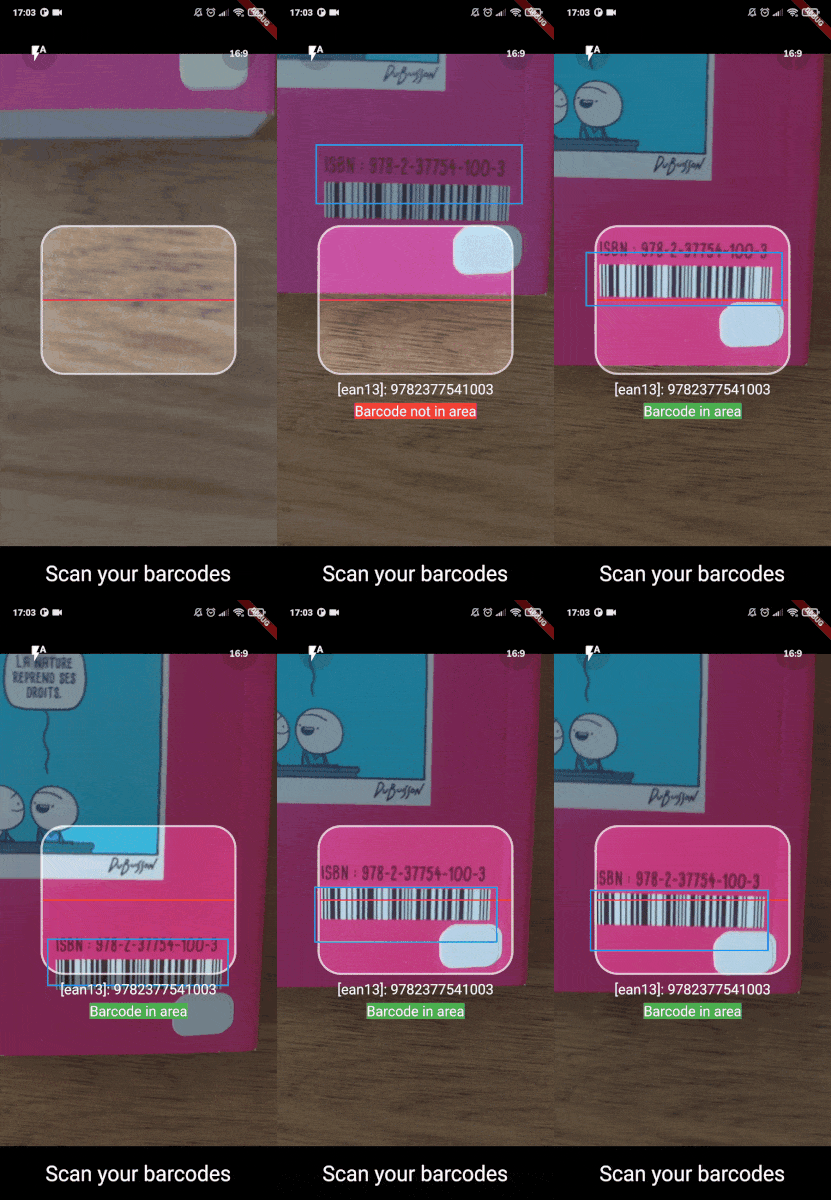
The BarcodePreviewOverlay results in the following:

As you can see, there are several elements.
Some of them are widgets, others are drawn on the canvas thanks to a CustomPainter.
The CustomPainter draws the following:
- a semi-transparent black overlay with a cut in the center: this is the scan area
- there's also a red line and a border around the scan area
- a blue rectangle around the detected barcode
In the other hand, all the text is written with simple Text widgets.
The build() method of the BarcodePreviewOverlay mainly consists of the following:
// 1.
IgnorePointer(
  ignoring: true,
  child: Padding(
    // 2.
    padding: EdgeInsets.only(
      top: widget.previewRect.top,
      left: widget.previewRect.left,
      right: _screenSize.width - widget.previewRect.right,
      bottom: _screenSize.height - widget.previewRect.bottom,
    ),
    child: Stack(children: [
      // 3.
      Positioned.fill(
        child: CustomPaint(
          painter: BarcodeFocusAreaPainter(
            scanArea: _scanArea.size,
            barcodeRect: _barcodeRect,
            canvasScale: _canvasScale,
            canvasTranslate: _canvasTranslate,
          ),
        ),
      ),
      // 4.
      Positioned(
        // 5.
        top: widget.previewSize.height / 2 + _scanArea.size.height / 2 + 10,
        left: 0,
        right: 0,
        child: Column(children: [
          Text(
            _barcodeRead ?? "",
            textAlign: TextAlign.center,
            style: const TextStyle(
              color: Colors.white,
              fontSize: 20,
            ),
          ),
          if (_barcodeInArea != null)
            Container(
              margin: const EdgeInsets.only(top: 8),
              color: _barcodeInArea! ? Colors.green : Colors.red,
              child: Text(
                _barcodeInArea! ? "Barcode in area" : "Barcode not in area",
                textAlign: TextAlign.center,
                style: const TextStyle(
                  color: Colors.white,
                  fontSize: 20,
                ),
              ),
            ),
        ]),
      ),
    ]),
  ),
)
Let's break down the above code:
- We use an
IgnorePointerto ignore all the touch events. Otherwise, our widget would block the touch events on the camera preview, including the tap to focus feature. - Thanks to the previewRect, we know how our preview is positioned on the screen. By adding padding corresponding to the
previewRectboundaries, we ensure that thechildis exactly the same size as the preview. - We draw the scan area on the canvas thanks to a
CustomPaintwidget. - We add some text widgets to show the barcode read and if it is in the scan area.
- Since the scan area is in the middle of the screen, it's easy to position elements below it.
widget.previewSize.height / 2is the middle of the screen,_scanArea.size.height / 2is half the height of the scan area, and the last+ 10is just a margin.
The scan area is calculated based on the previewRect for this example:
_scanArea = Rect.fromCenter(
  center: widget.previewRect.center,
  width: widget.previewRect.width * 0.7,
  height: widget.previewRect.height * 0.3,
);
This implies that the scan area will change slightly if the aspect ratio changes (previewRect changes with the aspect ratio).
We'll not dive into the code of the CustomPainter here, but you can check the code yourself: it's quite simple.
In fact, the most complicated part comes from the parameters given to BarcodeFocusAreaPainter.
How to know if a barcode is within the scan area?
Whenever we get a new list of barcodes detected by MLKit, we iterate over them to know if one of them is within the scan area.
This happens in the didUpdateWidget() method:
@override
void didUpdateWidget(covariant BarcodePreviewOverlay oldWidget) {
    if (widget.barcodes != oldWidget.barcodes ||
        widget.analysisImage != oldWidget.analysisImage &&
            widget.analysisImage != null) {
      _refreshScanArea();
      _detectBarcodeInArea(widget.analysisImage!, widget.barcodes);
    }
    super.didUpdateWidget(oldWidget);
}
_detectBarcodeInArea() holds the logic to know if a barcode is within the scan area.
Let's see the code:
 Future _detectBarcodeInArea(AnalysisImage img, List<Barcode> barcodes) async {
    try {
      String? barcodeRead;
      _barcodeInArea = null;

      // The canvas transformation is needed to display the barcode rect correctly on android
      canvasTransformation = img.getCanvasTransformation(widget.preview);

      for (Barcode barcode in barcodes) {
        if (barcode.cornerPoints.isEmpty) {
          continue;
        }

        barcodeRead = "[${barcode.format.name}]: ${barcode.rawValue}";
        // For simplicity we consider the barcode to be a Rect. Due to
        // perspective, it might not be in reality. You could build a Path
        // from the 4 corner points instead.
        final topLeftOffset = barcode.cornerPoints[0];
        final bottomRightOffset = barcode.cornerPoints[2];
        var topLeftOff = widget.preview.convertFromImage(
          topLeftOffset.toOffset(),
          img,
        );
        var bottomRightOff = widget.preview.convertFromImage(
          bottomRightOffset.toOffset(),
          img,
        );

        _barcodeRect = Rect.fromLTRB(
          topLeftOff.dx,
          topLeftOff.dy,
          bottomRightOff.dx,
          bottomRightOff.dy,
        );

        // Approximately detect if the barcode is in the scan area by checking
        // if the center of the barcode is in the scan area.
        if (_scanArea.contains(
          _barcodeRect!.center.translate(
            (_screenSize.width - widget.preview.previewSize.width) / 2,
            (_screenSize.height - widget.preview.previewSize.height) / 2,
          ),
        )) {
          // Note: for a better detection, you should calculate the area of the
          // intersection between the barcode and the scan area and compare it
          // with the area of the barcode. If the intersection is greater than
          // a certain percentage, then the barcode is in the scan area.
          _barcodeInArea = true;
          // Only handle one good barcode in this example
          break;
        } else {
          _barcodeInArea = false;
        }

        if (_barcodeInArea != null && mounted) {
          setState(() {
            _barcodeRead = barcodeRead;
          });
        }
      }
    } catch (error, stacktrace) {
      debugPrint("...sending image resulted error $error $stacktrace");
    }
  }
- Depending on which Sensor we use and the image rotation of the screen, the canvas needs extra transformations to match the coordinates of the different elements we want to draw.
- Iterate over the barcodes detected by MLKit and check if one of them is within the scan area.
- We calculate the top left and bottom right corners of the barcode. More on this below.
- We create a
Rectfrom these two points. - We check if the center of the barcode is within the scan area.
- If a barcode is within the scan area, we update the state to show it.
To help you converting an analysis image to the preview coordinates we provides functions.
/// this method is used to convert a point from an image to the preview
/// according to the current preview size and the image size
/// also in case of Android, it will flip the point if required
Offset convertFromImage(
    Offset point,
    AnalysisImage img,
);
The AnalysisImage also provide you the required transformation (It seems that the 180 / 270 cases are not working on all phones right now)
abstract class AnalysisImage {
    ...
  // Symmetry for Android since native image analysis is not mirrored but preview is
  // It also handles device rotation
  CanvasTransformation? getCanvasTransformation(
    Preview preview,
  );
With those two functions you can just draw your points without doing any math.
From MLKit coordinates to screen coordinates
MLKit takes an AnalysisImage as input, and returns a list of Barcode objects.
On Android, you can set a different resolution for your image analysis than the preview, which means that they might not have the same aspect ratio!
Here is an example:

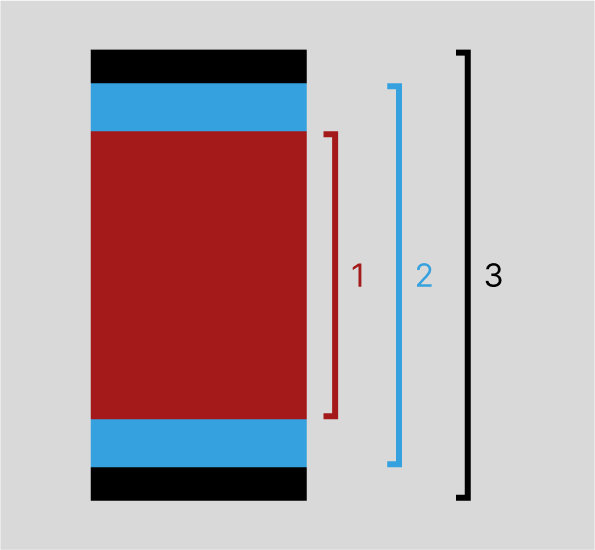
In the picture above, there are 3 parts:
- The image analysis, in 4:3 for this example
- The preview you can see, in 16:9 here
- The screen, which has a wider aspect ratio than the preview
In fact, the image analysis seems to have the same width as the preview, but it's because we enlarged it. In reality, on Android your image analysis might be at 352x288 for example to get good performances.
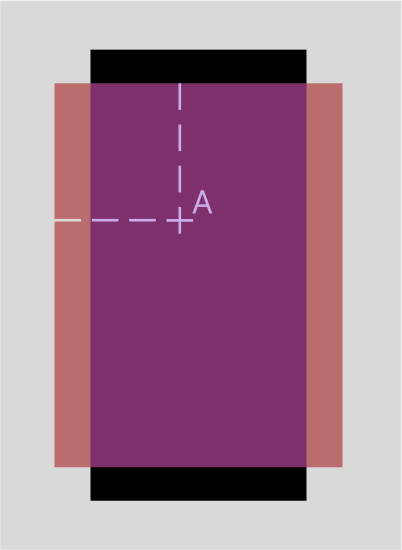
In our example, the point A is the coordinate of one of the corners from a barcode that MLKit detected. That's the coordinate we need to translate to screen coordinates.
However, a camera might not see the same things in a 4:3 image and a 16:9 image.
On Android, the AnalysisImage contains a cropRect property that correspond to the area both image have in common.

The image analysis now goes outside the screen because it has been zoomed to match what is seen on the preview image.
The purple part is what corresponds to the cropRect area of the image analysis.
The method _croppedPosition transforms the coordinates of the image analysis (in red) to the coordinates of the preview image (in blue).
Offset _croppedPosition(
  Point<int> element, {
  required Size analysisImageSize,
  required Size croppedSize,
  required Size screenSize,
  // 1.
  required double ratio,
  // 2.
  required bool flipXY,
}) {
  // 3.
  num imageDiffX;
  num imageDiffY;
  if (Platform.isIOS) {
    imageDiffX = analysisImageSize.width - croppedSize.width;
    imageDiffY = analysisImageSize.height - croppedSize.height;
  } else {
    // 4.
    imageDiffX = analysisImageSize.height - croppedSize.width;
    imageDiffY = analysisImageSize.width - croppedSize.height;
  }

  // 5. Apply the imageDiff to the element position
  return (Offset(
            (flipXY ? element.y : element.x).toDouble() - (imageDiffX / 2),
            (flipXY ? element.x : element.y).toDouble() - (imageDiffY / 2),
          ) *
          ratio)
      .translate(
    // 6. If screenSize is bigger than croppedSize, move the element to half the difference
    (screenSize.width - (croppedSize.width * ratio)) / 2,
    (screenSize.height - (croppedSize.height * ratio)) / 2,
  );
}
Let's break it down a bit:
- The ratio parameter is the one between croppedSize and previewSize
- flipXY is a property that depends on the current Sensor and image rotation
- Determine how much the image is cropped
- Width and height are inverted on Android
- Apply the imageDiff to the element position
- If screenSize is bigger than croppedSize, translate the position to half their difference
Additionaly, we translate the result of _croppedPosition because we used a Padding to place elements on top of the preview:
_croppedPosition(
  ...
).translate(-widget.previewRect.left, -widget.previewRect.top)
The translate value matches the left and top padding we've set.
You can find the complete example of this demo in preview_overlay_example.dart.